Tuesday, July 9, 2019

CARDING AND CLEANING your Buttons the EASY WAY

E-Z peazy CLEAN AND CARD –  

(Flying Button Ranch is a participant in the Amazon Services LLC Associate Program. Links below provide a means for me to earn a small fee by linking products mentioned in my blog to Amazon.com, at no additional cost to you).

I love button collecting, but HATE the chore of putting holes in matboard to card. Mostly because it kills my hands I think, and it takes FOREVER to use an awl to punch holes in a card. By the time I’m done, my hands are killing me and I’m over it... putting off getting the buttons on the cards in favor of something fun (like Wine and Cheetos). 


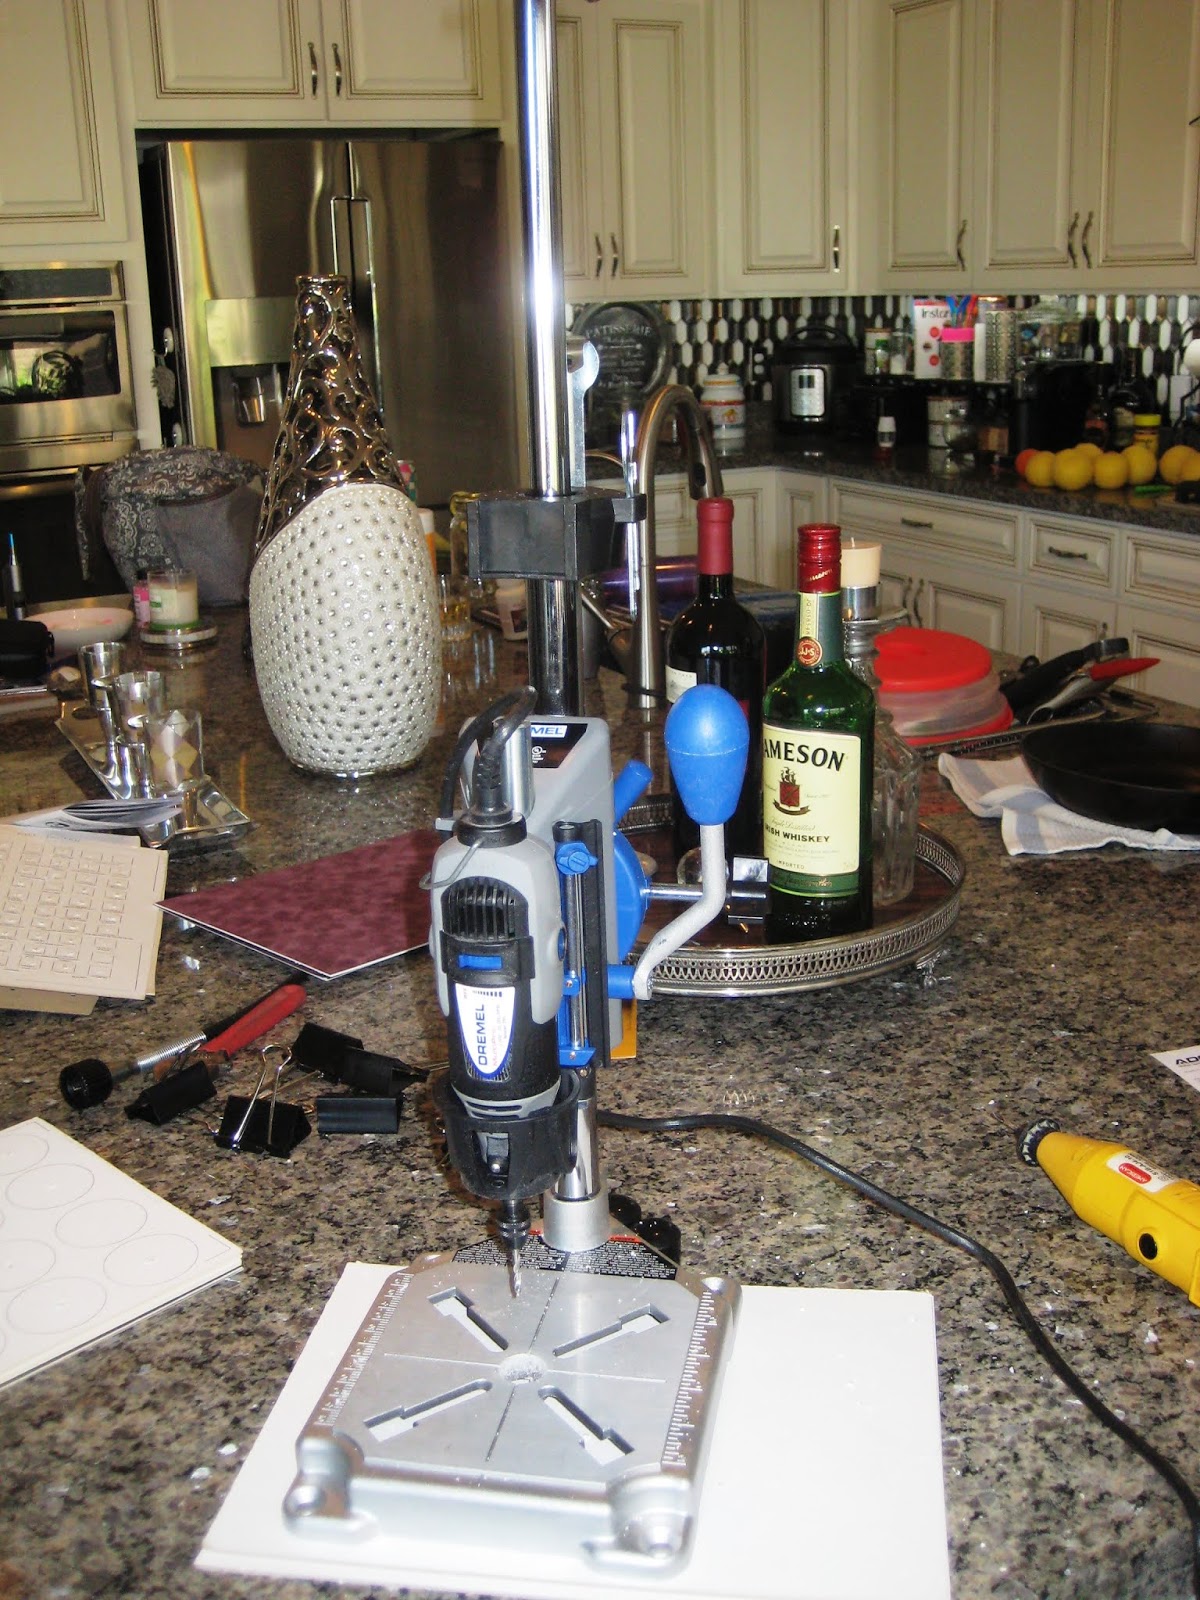
So, while having some wine, I started thinking about making carding easy and more fun. What makes holes without me having to hold and be strong? A drill press. Do I have one? NO  Do I have room for one if I buy it? NO. I do have a drill... my Dremel. Hmmm. *Runs to Google* Ahhhh HA!


Well, A MINI DRILL PRESS would work! It would go through A SMALL STACK OF MATBOARD! But what if it also POLISHED/CLEANED buttons? 

OMG take my money! MAGICAL!

And I so I went to Da Google, found/ordered one. I have had it for a while and I’ve FINALLY fixed the problem of getting lots of matboard punched and ready to card. Bonus? Not poking yourself with an awl. LOL 

I already had a DREMEL MULTIPRO with adjustable speed, all the attachments and a FLEX SHAFT. It was a birthday gift from Mr. FBR years ago. I used it all the time, even holding on to it, and trying to drill cards with it, it worked for that... sort of (and was dangerous as heck).  Then, THIS arrived:


NOW I use this fabulous little DREMEL DRILL PRESS to drill ALL my cards (multiples at ONE TIME) and to BUFF/POLISH buttons! 

This was a game changer for me, and I give it 5 star buttons. 

I can highly recommend this little miracle worker (and if you already have a Dremel VARIABLE SPEED Multi-tool to begin with, just getting this DRILL PRESS is super inexpensive). Just what I'll save on Band-aids, Advil and Aspercreme alone will help to pay for it... Ha ha

It has a Flex Shaft Tool Stand on the top also, which allows for telescopic adjustment for a Flex Shaft (16-29 inches) AND a "Crows Nest" for storage of bits, buffers, wrenches and other accessories. Cord management features. Nice!

  • Note: Compatible with Dremel Rotary Tool models 100, 200, 275, 285, 300, 395, 398, 400, 800, 3000, 4000, 4200, 8100, 8200, 8220


Here is everything you need to know to use it:

PATTERN ON YOUR CARD: I either use a plastic template to draw circles in a pattern and mark where the holes will go ON THE TOP CARD, OR I use an old matboard with a pattern of holes already punched (Placed on the top of the stack of cards I'll be drilling. The other option is to just mark dots on the TOP CARD in any pattern I want. 

PRE-DRILLED CARD WITH HOLES TO USE AS TEMPLATE.

OLD COMPETITION CARD, USED AS TEMPLATE.
Yup, a DIMINUTIVE card with 70 !$*@#! HOLES
THAT I ORIGINALLY HAD TO AWL PUNCH BY HAND. UGH!
CLAMPING: NEXT, I clip the 4 or 5 undrilled cards together (with the pattern on top) with LARGE 2" BINDER CLIPS.


USE 2" BINDER CLIPS TO CLAMP
ALL THE CARDS TOGETHER,
TIP: YOU CAN REMOVE THE SILVER EAR PIECES BY SQUEEZING
THEM TOGETHER IF THEY'RE IN THE WAY OF DRILLING!
PUT THEM BACK IN/ON WHEN YOU'RE DONE TO REMOVE THE CLAMPS.

Put on EYE PROTECTION (DO as I SAY, not as I DO). LOL  

The base has areas to screw it down to a table top. I've used it without screwing it down, but I'm thinking about attaching it to a large old wood cutting board. It'll keep it stable, I'll be able to move it and it won't take up too much room.

TURN IT ON: I use the higher speeds. Put your stack on the Without much force or pressure, pull down the handle, letting the drill do the work, drilling through the spots you want, easily moving the card around to the next marked area. You can bring down the handle/drill bit and hover over the spot to make sure you hit it exact. 

ALL SET UP AND READY TO GO!

SO EASY! GUESS WINE AND CHEETOS WILL HAVE TO WAIT!

QUICK DRILLING OF FLOCKED COATED MAT BOARDS
AND WOVEN FABRIC BOARDS
(THAT'S HARD TO PUNCH BY HAND)! <3
BIG PILE OF DRILLED CARDS IN MINUTES
AND READY TO GET CARDING!
I had a few designs that required me to make a few of the center holes myself (2 or 4 holes out of 30 on 4 or 5 cards? Well, I can certainly live with that!). I just mark the spots I can't reach with my awl, and use my Dremel with the FLEX SHAFT ATTACHMENT to zip in those holes while the card is still clipped together. The Drill press has a top attachment built in to hold a Flex Shaft attachment ALSO. Super!  

If you don't have one, you can still remove your Dremel, leave the cards clipped together and zip in those holes or just use your awl for the 2 or 4 you need to do.

MARKING A FEW CENTER SPOTS WITH AN AWL THAT I COULDN'T
REACH IN THE VERY CENTER. I USE THE DREMEL BY HAND,
OR LEAVE CLAMPED, AND USE THE FLEX SHAFT
OR YOUR DREMEL BY HAND TO DRILL THOSE
COUPLE OF HOLES THROUGH ALL THE CARDS AT ONCE.

After I'm done, I get out my Dust Buster hand vac, and suck up all the little paper pieces from drilling the cards. Yeah, kind of messy, but not bad! Now to pour wine, turn on the tunes, and get to carding buttons!


CLEANING/BUFFING your buttons! 

A BONUS? The drill press allows you to turn the Dremel sideways 90 degrees FOR BUFFING AND CLEANING. 

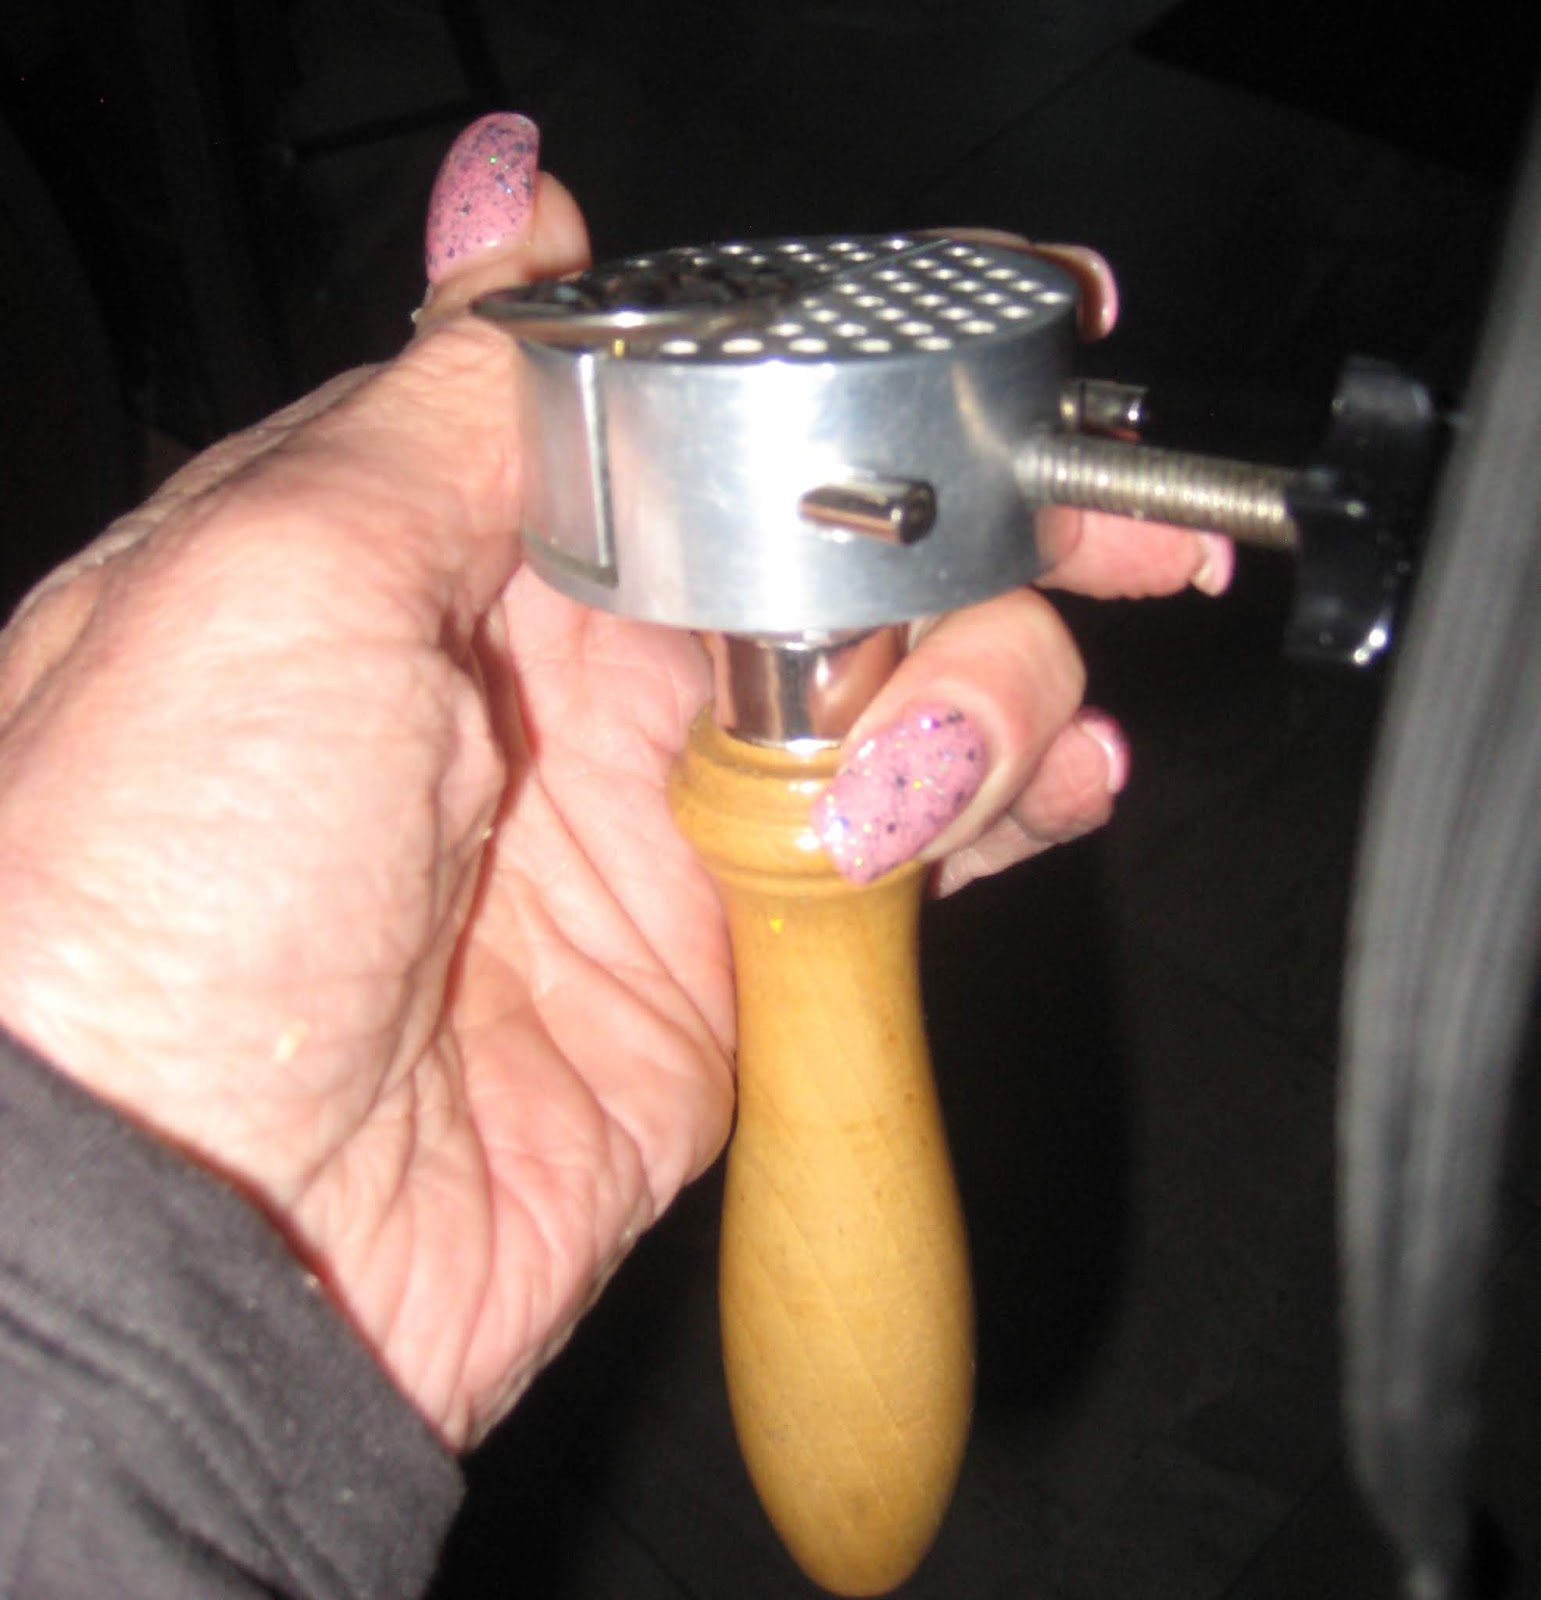
I went nuts when I discovered THAT! Oh! And if you use the HAND VISE I talked about last week on my Flying Button Ranch Facebook page, you don’t need to try to hold on and grip the button while buffing/cleaning it!! I got tired of having buttons fly across the room (and usually they transported to an alternate universe, never to be seen again! LOL).

BUFFING WHEELS can be found at most home supply places (Ace Hardware, Home Depot) but I usually will throw some in my cart on good ol' Amazon. Off brands work, but you may need to wrap the metal shaft with a bit of painter's tape or electrical tape to get it to snug up right when tightening the chuck that holds it. 

With a Dremel buffing wheel and a bit of Jewelers rouge/POLISHING COMPOUND (put it on the buffing wheel when it's spinning/running) and then just get the button pressed on it! Clean and shiny in NO TIME! YaY! 

A few buffing wheels are usually included with Dremels when you buy them, but you can always stock up on them because you'll go through LOTS OF THEM once you start to shine and clean with this baby!

BARS USED TO ADD POLISHING COMPOUND TO BUFFING WHEEL ON THE DREMEL
THE DIFFERENT TYPES YOU CAN BUY
AND USE TO CLEAN AND POLISH YOUR BUTTONS. 

INDISPENSABLE! 
GREAT TOOL TO GRAB ON TO YOUR BUTTON!
SEE LINKS BELOW

ADDING POLISHING ROUGE TO A SPINNING BUFFING WHEEL

ANOTHER VIEW OF THE DRILL PRESS SET UP FOR BUFFING
(AND REFRESHMENTS FOR AFTERWARDS, LOL)

BUFFING/CLEANING A BUTTON
CLAMPED IN TO THE PIN VISE (SEE LINKS FOR IT BELOW)
USING THE DREMEL DRILL PRESS
TURNED 90 DEGREES AND A BUFFING/WHEEL
WITH BUFFING COMPOUND.
Worked great! Here are some before/after of a few buttons I had sitting around to clean:
BEFORE - UGH, THAT'D BE A PIA TO DO IT BY HAND!

AFTER BUFFING WITH THE NEW TOY! FAST AND EASY!
BEFORE

AFTER
BEFORE - STEEL CUP WITH BRASS AND ENAMEL

AFTER - STEEL CUP WITH BRASS AND ENAMEL

You can find all these great helpers on Amazon! Here's the links to everything you'll need:
DREMEL DRILL PRESS -> https://amzn.to/301ULTU
DREMEL VARIABLE SPEED MULTITOOL KIT TO DRILL/BUFF ->  https://amzn.to/2G1NGuW
2” LARGE BINDER CLIPS -  https://amzn.to/2JtbzfW
DREMEL FLEX SHAFT for other hand work and zipping in a few holes - https://amzn.to/2L8IxFy
HAND VISE (when using the Drill Press buffer or just working on rust removal on buttons, giving a quick polish, etc.)  https://amzn.to/2XCBg7C or  https://amzn.to/2NmVL3x 
COMPOUND BARS FOR BUFFING - https://amzn.to/2XBbEIj
BUFFING WHEELS FOR DREMELS - https://amzn.to/2LJ2VN9

All highlighted links lead to my Amazon affiliate links.

Thanks for reading! I hope you'll leave a comment (so I know you were here, LOL) and let me know if any of this has worked for YOU! Also, come check out my Facebook page AND say hello at https://www.facebook.com/FlyingButtonRanch/

Okay... off to card some buttons!
<3 FBR

Friday, March 29, 2019

FUN VIDEO ON COLLECTING BUTTONS

Sometimes I just goof off. (Okay! Daily. LOL). I'll just put keywords into Google and see what pops up from the Interwebz.  Tah*Dah

I hadn't seen this YouTube video (below this post) of Darlene Gruber speaking about Button Collecting. It was recorded at the Brass Armadillo antique mall in Denver, Colorado on April 17, 2014.

It's about an hour long, but worth the watch, so settle in with a drink and snack LOL.
Wine and Cheese = Wine and Cheetos. Same thing, right? Yummy!

If you don't know much about button collecting, she gives a nice overview on button collecting.

If you're a seasoned collector, it could inspire YOU to go give a talk on collecting and go gather up some new interest for our hobby. Right?

Enjoy!
at FLYING BUTTON RANCH  (P.S. for more on Button Collecting, come follow me on the FBR FACEBOOK PAGE to read DAILY posts on button collecting!)


Thursday, March 14, 2019


MOUNTING AND STORING YOUR BUTTON COLLECTION


Card of  Design Under Glass buttons
mounted on Matboard.
FLYING BUTTON RANCH COLLECTION.
So, you've started HOARDING (I mean COLLECTING) Antique and Vintage BUTTONS... For something so small, they can get out of control quickly! Right!? Boy, don't I know it sister!

Are you looking at jars, boxes and tins FULL of buttons? Ya think it's time to do something differently so you can REALLY enjoy your new collection and see what you have? YUP!! Well, you landed in the right spot today!
Boxes of buttons... gah! WHAT is in there?? 
Buttons really should be carded or stored on cards in order to protect them. Jars and tins (especially if sealed up) can cause all kinds of problems for buttons. Plastic buttons gas, rusty metal buttons causes havoc on everything, and it all is a deadly combination for all old buttons.
Jars and tins full of a mix of plastic, metals,
wood and other things (rusty nails, pins, etc.)
can cause SERIOUS problems quickly
for old buttons!
Get them out of there!!
Early button collectors would sew their buttons with thread to pieces of linen toweling, sew or attach buttons to old paper plates and cereal or cardboard box pieces. They also used old metal paper clips, rusty safety pins, pieces of leather cut in triangles (and shoved through the shank), pipe cleaner and all kinds of things to attach buttons. I’ve seen how these substandard fasteners and acidic fabric and paper pieces cause button damage (corrosion and off gassing). Baaaaaaaadddddddd! So remove the buttons as soon as you can.
Old early collection (c. 1940s)
sewn to a large piece of linen toweling.
Flying Button Ranch Collection.
China Button Collection
Sewn to an old paper plate c. 1940-60
Photo from Pinterest

Old button collection sewn to an old paper plate c. 1940-60
Photo from Pinterest

MOUNT THEM ON MATBOARD: The best card stock material to use are pieces of matboard (also called Crescent board) cut to 9 x 12 inch size. This size is also the standard NBS size when competing. Scraps in smaller sizes are fine for personal storage of your collection, so it's not a hard/fast rule for your own collection. 

Matboard in a rainbow of colors.
You also can find Matboard at hobby/craft stores in large sheets and cut them yourself or ask if they will cut them for you (usually for free). For example: Michael's craft store sells a standard sheet of 24” x 36” for $8.36 and get quite a few 9x12 pieces. Collectors generally use a 9"x12" size because that is what is used when submitting buttons for competition. You, however, get to choose what ever size you want. A 6 x 9" piece can store well also and smaller scrap sizes of board are easier to come by.
Look for sales and on-line coupons for framing shops and hobby/craft stores. It comes in a variety of colors and finishes (like flocked velvet, metallic, printed, etc.). You can also find better board in Acid Free types. Pick pretty colors to make a lovely wall display to complement the colors in your home! Stickers, stamps and postcards can also make a fun display with your buttons.

FREE IS BETTER: Various “scrap” sizes of matboard can be purchased fairly cheaply from art/picture framing shops (use Google to find one near you) and sometimes they’ll just give them to you FREE if you stop in each month and ask for them! 

That’s what I did for quite a while... stopping in a large framing shop and gallery each month and asking for the scraps. Sadly, when the generous owner passed away, his son decided to close the shop. When I asked him about the matboard, he asked me if I wanted it. Well, SURE. But how much? 

Well, he GAVE ME all the matboard in the shop that I could haul away in my truck if I wanted it! Yup, ALL. Free, gratis, for nada! Full sheets, scraps, TONS of pieces in colors, finishes and textures. CARDING HEAVEN! Of course, I took it ALL and I looked like the Clampett family moving when I LOADED my pickup truck (tied the mountainous pile down to the truck bed and put small pieces in the crew cab back seat because there was so much!) and drove out of there. LOL and so am set for life with matboard!
It's amazing what you can get in a TRUCK.
CUTTING MATBOARD: I use an extra large vintage wood guillotine paper cutter for the large sheets, and smaller ones for the 9x12 sizes (find them at resale shops! That's where I found all of mine.), but you can also use a sharp hobby knife and GOOD ruler. Cut the board to to 9 x 12 size pieces, but save the smaller pieces for miscellaneous button mountings. 
A vintage Guillotine Paper Cutter. Love these!!

TO DESIGN OR NOT TO DESIGN: A pretty layout is fun if you’re putting the buttons in competition or on the wall for display. Also, you can use fun postcards, stamps, paper scraps, etc. to make a fun and creative mounting! Get inspired on-line/Pinterest! 

If you don't know much about materials or age of your buttons NO WORRIES, mount them by color or pictorial (like all Dog buttons together). Just do what ever gives you A HAPPY.

Have FUN with your buttons and hobby! Lay-out the buttons as you think you’ll like them, mark the spots of each button on the matboard and use a Craft Circle Template around each mark. 

If you like the look of the circles, you can buy pre-made clear rigid plastic design templates. They're reusable and available through some dealers (like this page http://amazinglaserdesigns.com/button-mats-templates/and cost $8.50 each) 
and Button Images 
(she also sells almost every item a buttons collector needs and all the stuff I’m talking about in this article, and MORE). 
Oh yeah... Nope... I make nothing from the links above! Just tell them FBR sent you! *grin*

Button templates for mounting.
A selection from Amazing Laser Designs (see link above).
Also, some button clubs have all kinds of template designs to LOAN to members for FREE so it's worth joining up to one in your area for help with buttons and to answer your questions!!

Note: When mounting for competition, you’ll want to use a template to match the size/number of buttons required for the award, so keep that in mind when choosing templates!

PUNCHING HOLES: If a shank button, the shank is going to go through the board, you’ll want to use a METAL AWL or Scratch Awl to punch a good size hole to accommodate the shank, allowing the button to sit flat on the matboard.  
Scratch Awl for punching holes.
You can get an Awl in any hardware store (Home Depot) or look in your husband's/friends tool box. A friend of mine had her dad cut down a screwdriver really short for me and he ground the tip into a deadly sharp point. It's perfect (and yes, I've put it into my hand, fingers and leg a few times. Owwwch!).

If you are mounting a 2 or 4 hold sew through, the double spiked corn cob holders work great for putting 2 holes in a card and mounting those types of buttons flat. Use a wood cutting board with some Styrofoam or carpet over it to punch holes. Bend the wire in a U, Feed each end of the wires through each one of the 2 holes (only need to use 2 holes on a 4 hole button), twist the button wires together on the back of the card. Tah*Dah! A button is mounted!
CORN HOLDERS - Great way to make holes to
mount sew-through buttons!
(Insert CORNY pun spot HOLDER *here*)
FBR TIP FOR MAKING LOTS OF QUICK CARDS: If I just want make a bunch of standard matboards for storing certain types of buttons in my collection quickly (a work card, say of all red glass or all celluloid of a certain kind), I’ve used a dremel with a small DRILL BIT  to make holes. How many buttons I put on a card depends on the size of the buttons, so for a group of large buttons I may only drill 15 or 20 holes, while for my small glass buttons I may drill 40.  Here's how I do it:

I put a stack of 4-8 matboards together, draw the template for the hole spacing on top of the top matboard and clip all of them together with heavy duty binder clips or any good clamps. Then I just drill through them all (with a Dremel drill bit or small hand drill) and get quite a few done in one shot! 

I also just ordered a Dremel Drill Press from Amazon. I’m hoping it makes drilling holes in cards with my Dremel even easier! I’ll let you know!

(Flying Button Ranch is a participant in the Amazon Services LLC Associate Program. Links below provide a means for me to earn a small fee by linking products mentioned in my blog to Amazon.com, at no additional cost to you).

UPDATE: LOVE, LOVE, LOVE using this to drill through my cards! I either draw circles or place dots on the top card, and then clip 4 or 5 cards together with the binder clips and easily bring down the handle. Highly recommended (and if you have the Dremel to begin with, just getting this is super inexpensive). A BONUS with this? The drill press allows you to turn the Dremel sideways, and with a BUFFING PAD you can polish your buttons on it! YaY! You can find the DREMEL DRILL PRESS AT AMAZON.


FASTENING THE BUTTONS ON YOUR CARDS WITH WIRE

Buttons are mounted with PLASTIC COATED COPPER WIRE. Yup, the plastic-coated copper telephone and computer cable wire. I look for it at swap meets, thrift stores, Habitat for Humanity resale stores, etc. Be sure to check the wire BEFORE BUYING, as some is fiber optic wiring and it  won’t work for mounting buttons. If the wire is in a plastic cased cable, ask to cut off and inch or two of the plastic that holds all the wires together to check to make sure it's a bendable, will stay in a wound state (make a circle out of the end of a wire) and is a small bundle of wires inside of the plastic casing and not some weird fiber optic stuff.

I have MULTIPLE SPOOLS of old phone wire and cable wire saved up. I sit and cut a big Tupperware bowl full of pieces, using wire cutters so they're ready for carding anytime the mood strikes. That's not often. LOL

I encouraged a button friend to stop whenever she sees a telephone or cable company truck stopped and working and ASK them nicely for any wire scraps. Of course she got some... for FREE (and it could be because that when she told the guy that she collected buttons, he figured she was crazy and he just wanted her to go away. Ha ha!).

  
My spools of wire and cables of computer wire.
I have enough to last for YEARS and
enough to share with Button Friends!
KYNAR WIRE: A super thin tiny wire with a coating of Kynar, get the 30 AWG ( American Wire Gauge) size. It was available at Radio Shack a few years ago, but I don’t know about today. Most model train and craft stores should carry it. It works great for diminutives, antique buttons (whistle buttons) with tiny holes, etc. Worth searching out for a small supply to have on hand for those types of buttons. You can find it on Amazon… but shop for best price and watch for how much you get in a spool! The number at the end (K-30-1000) is the feet in the spool (usually 1,000). That should last a WHILE. Right? Here is what I bought (link to Amazon)  KYNAR WIRE ON AMAZON

30 AWG Kynar coated Wire.
Prefect for Whistle buttons and
Diminutives with tiny holes!
NOTE:  Early collectors used pipe cleaners and the rust on those old buttons/cards is a good clue that the use can cause damage to your buttons by moisture being absorbed by the pipe cleaner which causes it (and the buttons/shanks and button body or parts that's made of steel) to rust or the GREEN MEANIES (verdigris) to grow on brass and copper metals. It’s unknown if modern pipe cleaner is going to rust, so you really want to avoid that also. 

Other DO NOT use items are the metal button cotter pins (will rust), safety pins (may rust or cause interaction), and tooth picks through the shanks at the back of a mounting card (will hold moisture in humid environments). 

Metal cotter pins. Throw away!
Plastic cotter pins are okay to use though!

FRAMING YOUR BEAUTIFUL BUTTONS: After your buttons are mounted, you’ll want to either display them on your walls, or safely store at home. You also can cut the matboard to fit any size FRAME for display at home. Note: keep buttons out of sunlight!! Most hobby stores also sell SHADOW BOX COLLECTION FRAMES with a glass front in various sizes which work great for buttons. Again, look for them on sale, buy with coupons or look in the clearance section.

Shadow box wall frames come in
all different sizes and are great for
buttons, buckles and studs!

POLY PROTECTION BAGS: The plastic I like are a flat, zip top, 2-4 mil thick in a 10”x12” size. Gives a bit of room for the card of buttons (unframed) and easier to get in and out if you cut a card a tad big. These will keep your buttons from getting scratched, broken, falling out of the bag if it comes loose and other damage while stored in a box or cabinet. You'll want open top, and 4 mil thick bags to really protect them from sitting next to each other. The larger 10 x 12 size is hard to find, so I get the 9 x 12 and just cut my general storage cards a 1/4" smaller in width (8-3/4 x 12).  I use these:AMAZON 4 MIL OPEN TOP POLY BAGS . 200 bags for about $19 and a great price for 200 of them (and you can always split them with a button buddy!).

BANKER'S BOXES are a great way to store your buttons once they are CARDED AND each card is PROTECTED with a plastic poly bag. You can stack boxes in a corner, under a bed (use bed lifts), stack in a closet, or throw a cute scarf or table cloth over a stack to make it look like an end table or console table. LOL

Banker's Boxes are an inexpensive way
to store your precious button collection!

FILE CABINETS: Eventually, you’ll think about getting one. LOL I started with a small 2 drawer cabinet, moved to a large/tall LATERAL FILE CABINET and now have 4 lateral file cabinets and a combo drawer/single lateral file unit in my button room. Yeah… FOUR plus. *sigh*


5 DRAWER LATERAL FILE CABINET.
This was an old cabinet I purchased
when a hospital got rid of them. BARGAIN.

Cabinets in my current Button Room.
The 4-drawer cabinets were purchased on Craigslist
from a used office furniture seller. Great buy!
The little yellow metal drawers on the top
are for sorting buttons that need to be carded.
They came from a hardware store that
went out of business. Perfect!
SHOP/JOB TICKET HOLDERS are used for button competition if you belong to a Button Society. They're used to hang the button card entries on racks for viewing by the public at a BUTTON SHOW. They also serve to protect your buttons. A must have (and some states have banned the bulky clunky wood/glass drop in frames for competition, like Arizona did).

C-Line makes a nice Stitched Shop Ticket Holder, both sides are clear, 9 x 12 Inches in size and 25 per Box  for about $20 (I also get mine on Amazon). 9 x 12 SHOP TICKET HOLDERS ON AMAZON There are also some all clear made by Avery, about the same price. You should be able to get some from Office Supply stores or get them ordered there also. Go in with a buddy to reduce the cost and split the box!
Box of 25 shop ticket holders on Amazon.

A shop ticket holder holding
this fun creative card of mine!
This is a SERIES set by Marie-Christine Pavone
Well FBR Friends, that’s all for today. Leave comments if you think I missed something, if you have a question, or just to say HOWDY. Feel free to share a link to this blog on your FACEBOOK page if you think your new button collectors would benefit from this article. Thanks for reading! Come see me on Facebook where I post fun button facts and fun Button Memes daily at FLYING BUTTON RANCH! <3 FBR


Tuesday, January 15, 2019

Button Books: What to buy?


Some of my books in my button room.
When it comes to books, I have no SHELF control!

Button Books:  What to buy?

ISBN thinking about you... *grin* (yes, there will be book puns!) You know button collecting is terrific. We all start a button collection for various reasons. Some of us just are interested in the pictorial or design. Perhaps you just want to collect buttons, any and all!  To many button lovers, age and material doesn't matter. There isn't anything wrong with this method of collecting...Until you start to ask questions about what you have. 

So, you get on the computer, and look at photos of buttons... and try a zillion key words.  *ugh*  And if you're like me, you look like this:


So, you started collecting and (sooner or later) are ready to CHECK OUT because you want to know MORE. WHAT is that material? WHEN was it made? WHO wore that?  IS this one really a button? WHY is that picture on that button! WHY is this shank so different looking!!!? WHY do they call it THAT?

WHY is that (little, ugly, weird, etc.) button SO FREAKING EXPENSIVE!!?? 

WHYYYYY?  LOL

The first few years I collected, I didn't have much of an idea about the National Button Society nor button clubs.  Information on the internet was zippo... nada.  I was basically floating along on my own, hoarding all the buttons I could find at swap meets, antique shops and 2nd hand stores.  Then, my husband bought me my first button book while on a vacation celebrating our anniversary.  The book was About Buttons by Peggy Ann Osborne.

With just that one book, the switch was flipped and I was learning about these tiny treasures. It is still is my favorite book of all time, and one I recommend to any new collector.  The book is around $80.00 new, but IMHO, well worth the cost.  This book answered lots of questions and made me want to know even MORE, MORE, MORE!!  So, as I could, I added more button books (and got myself to go see a button club).

Today I'll share a few favorites in my Button reference library with you, and give you my take on what's great about the books, what I feel is a must have, what you can live without (or at least wait until you find it at a bargain price).

The #1 spot is tied.  There are 2 books that I have dog eared, fallen asleep with and would chase someone down with my pointy button awl to get them back:

#1a:  ABOUT BUTTONS: A Collector's Guide, 150 A.D. to the Present.  Peggy Ann Osborne, 1994.  320 pages, colored illustrations.  I ADORE this book.  My copy is worn and tattered and I slept with it for months after buying it.  It takes you through various periods and explains the buttons that were worn at the time, along with slices of history and beautiful photos.  All books have errors, it's BOUND to happen, but this one is pretty on the money.  If I had to pick only one button book, this one would be it.


Closely followed by...

#1b:  Big Book of Buttons (BBB):  Hughes-Lester; First Edition (June 1981)  813 pages. Called the Button Bible by collectors, this book separates buttons out by material and then by pictorials.  I have my face in this book at least twice a week. While it's difficult to look up buttons in to identify something, if you read this book from cover to cover, you'll get a good grasp on how the National Button Society classifies buttons and you'll be seeing terrific buttons and some decent identifications. The BBB 1st edition has identification errors, and went out of print.  The old editions can be terribly pricey, as high as $500!!  Crazy!

The BBB was updated and reprinted in 2011 into 2 volumes (which makes it easier to read/handle) and was updated some. It sells for $375.00 plus $18.00 shipping.  I'm not sure it's worth it, so... if you can find an old copy of the BBB for $100-$250, I'd recommend to buy it (and use that extra $$$ for buttons!)!  You can always sell the old version for what you paid for it if you decide to buy this new updated version. If you love the old pictorial metal buttons, and want to know what the identifications/names were that they generally go by, then you really will want this book. I like big books and I cannot lie.

#2 The Collector's Encyclopedia of Buttons, Sally Luscomb.  242 Pages, 1968.  A forgotten older book, however, packed with lots of information.  Revised in 2007 and includes a price guide (ignore that) .  A great book to curl up with and absorb all the great information and button lingo/jargon. 

#3 National Button Society Classification Booklets:  Well, this isn't actually a book, but more like a booklet... and there are several that you should have.  Start off with that I really (REALLY) think you should join NBS, if only for the booklets and on line searches available to you through ALL of the NBS bulletins that were digitized and made searchable by keywords.  You can read all of the old bulletins starting from 1945 onward.  I LOVE their website for that reason, and I use their booklets constantly. 
Well worth the $35.00 yearly membership since you get all the access AND five (5) issues of the National Button Bulletin which is in color (fabulous every issue!) along with the Classification "Blue" Book with information on classifying buttons and also competing (if you wish to eventually do so).  
With membership, you can also purchase numbers 4, 5, 6 and 7 below:

#4 Black Glass Classification
(just updated by Joan Lindsay and Simone Kincaid, 64 pages and 800 color photos, and it's WONDERFUL!!)  $25.00 A must have for a new collector since black glass is one material you'll amass a ton of quickly!!  Great photos, information on both the old (Division I) and modern (Division III) buttons. Available on the NBS website (link above and below).


#5 Clear and Colored Glass Classification by Jane Ford Adams and revised by Jean Longo.  Revised in 2002, with wonderful information and color photos, 30 pages, $8.00.  Again, glass is going to flow into your collection quickly, so you might as well get this great booklet to get a handle on old and new glass.  Terrific photograph and lots of information which tells you about the old (Division I) and modern (Division III) buttons.  In color. Available on the NBS website (links below).


#6 Pearl and Shell Button Classification by Margaret Kelso and updated by Shirley Case in 2002.  Shell is wonderful and this is also a great 26 page booklet packed with photos and information.  $8.00.  Available on the NBS website (links below).


#7 National Button Society Section 9-A Synthetic Polymers by Jocelyn Howells and Nikki Deal  A complete study of all Plastics (except Celluloid).  A must have booklet!  Color photos and everything you need to know about those hard to identify and confusing plastics.  You'll be a pro at sorting Polyester from Nylon in no time! A BARGAIN at $5.00! Available on the NBS website (links below).


#8 Button Materials A-Z: Identification Guide, Jocelyn Howells.  $55 includes shipping. Everything you'll need to figure out what a button is made of. Order direct from the author buttonjoss@frontier.com 


Now, there are 100's of other button books. Some out of print, but can be had dirt cheap on eBay, Amazon and book sites like Abe Books. 

IMHO, the following books are also worth having. So, Check your shelf before you wreck your shelf.. Do some comparison shopping first, and get these super, mostly inexpensive books for the great photos, info and just a good book to sit with:

Buttons: The Collector's Guide to Selecting, Restoring, and Enjoying New and Vintage Buttons; Courage Books, 1994 by Fink & Ditzler

Baubles, Buttons and Beads The Heritage of Bohemia; Schiffer, 1997 by Jargstrorf, S.  Super information on the early Bohemian/Czech button industry with beautiful pictorial examples of Beads, Buttons and Jewelry (what's not to like!?).

Button, Button: Identification and Price Guide: Identification and Price Guide; Schiffer, 2000 by Peggy Ann Osborne. I truly adore this author's books! See my #1 books above.  And by the same author... Fun Buttons; Schiffer, 1994 by Peggy Ann Osborne. I spotted one on eBay for less $8!! 


Antique and Collectible Buttons: Identification and Values; Collector Books, 1997 and Antique and Collectible Buttons: Identification and Values, Volume II; Collector Books, 2002 - both by Debra Wisniewski. Fun buttons that most new collectors can easily find.

Buttons by Epstein & Safro; Harry Abrams, 1991. Hardcover, 175 pages, color (don't get the tiny book!). A Gorgeous book filled with rare and wonderful buttons.

Now, if you would rather spend your money at button shows, eBay and ETSY *grin*, you can always BOOK it over to your local library! Also, join a local button club! They usually have a lending library and you might also get a free button mentor/button buddy just for hanging out with them! 

And if you're wondering how many button books there are (including crafting with buttons, military, written in other countries/foreign language, uniform, etc.) there are book lists at several websites you can use to look at button books that may also feed your button soul:

WESTERN REGIONAL BUTTON ASSOCIATION BUTTON BOOKS BY TOPIC

BUTTON IMAGES BOOK LIST

NATIONAL BUTTON SOCIETY STORE (no, I don't make any money on links!) You can purchase several of the booklets listed above here AND join NBS!

Thanks for reading today! I hope you'll follow my blog (yes, I've been neglectful!) as I have plans to do all kinds of fun and informative button posts soon!  I hope you'll follow the FBR blog and leave me a comment!

ALSO be sure to wander over to my FLYING BUTTON RANCH facebook page! I post there a few times a week. Lots of fun stuff going on there also (so be sure to Like and FOLLOW the page)!
I hope you've had a GOOD READ here and that these book puns have tickled your SPINE. Okay! I'm done!!
Happy Reading and Buttoning!